UCAD Tool User Guide
This Go Integrator UCAD tool is made available to anyone wishing to use it. This program is distributed in the aim that it will be useful, but WITHOUT ANY WARRANTY expressed or implied, including the implied warranties of FUNCTION, MERCHANTABILITY or FITNESS FOR A PARTICULAR PURPOSE.
IN NO EVENT SHALL Go Integrator OR ANY OF ITS PARTNER COMPANIES BE LIABLE FOR ANY DIRECT, INDIRECT, INCIDENTAL, SPECIAL, EXEMPLARY, OR CONSEQUENTIAL DAMAGES (INCLUDING, BUT NOT LIMITED TO, PROCUREMENT OF SUBSTITUTE GOODS OR SERVICES; LOSS OF USE, DATA, OR PROFITS; OR BUSINESS INTERRUPTION) HOWEVER CAUSED AND ON ANY THEORY OF LIABILITY,WHETHER IN CONTRACT, STRICT LIABILITY, OR TORT (INCLUDING NEGLIGENCE OR OTHERWISE) ARISING IN ANY WAY OUT OF THE USE OF THIS SOFTWARE, EVEN IF ADVISED OF THE POSSIBILITY OF SUCH DAMAGE.
UCAD Tool
UCADTool uses Ldifde command line program to connect and modify the data on the Active Directory.
IMPORTANT: It is recommended (but not required) for the UCAD Tool to run on the Domain Controller or at least on the Windows Server machine that has got the Ldifde on it and is a member of the domain where you would like to apply changes to the client software.
You will need two files: UCADTool.exe and ucsettings.ldf.
How to Connect
- Run the UCADTool.exe program (make sure that ucsettings.ldf is in the same directory).
- In the top menu bar enter your domain name, username and password.
Please make sure that the user you log in with has enough rights to access and modify the records on the Active Directory.

- After the credentials have been accepted you will be prompted with the following screen, click on "Yes" to continue (or "No" to abort).
This will extend the Active Directory schema to enable you to store UC settings information.
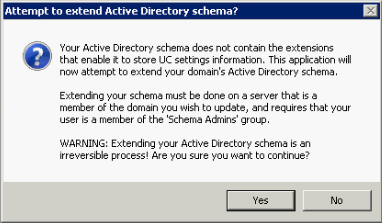
- WARNING: Extending your Active Directory schema is an irreversible process!
- The software will launch a Command Prompt window, where you will see the process of connecting, logging in as well as importing directory from ucsettings.ldf file to your domain.
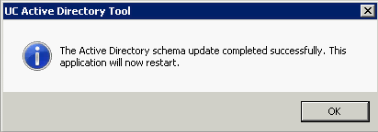
Once the process has finished you will be prompted with this window, click "OK" to restart the application.
- Now you have to re-enter the login credentials (see point 2).
- By default the software will download all users and display their information in two columns "Name" and "Windows username". Now you can select and edit settings for each individual user. To edit the user settings you will first need to add a new column in the "New Column:" textbox.
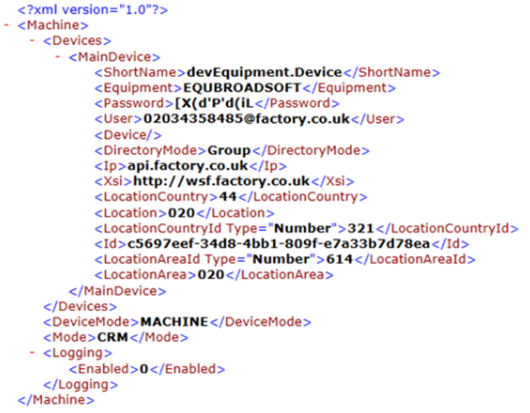
- To add a new column you will need to use the same format as seen in the PC client XML settings file (Settings.xml). This usually resides in "C:\Windows\ProgramData\[ClientSoftwareName]\Settings.xml" or "C:\Users\Username\AppData\Roaming\[ClientSoftwareName]\Settings.xml". Depending on what type of data or settings you are considering to change, please refer to the following examples.
Example 1
The following "Machine.Devices.MainDevice.User" path would create a column which allows you to change an individual user's login credentials directly from the UCAD Tool. Note: The XML format/structure is exactly the same across all clients.
Example 2
In like manner turning on or off dialing options would require you to build a path for those settings. For example the "Web page Dialing" would require from you to add a column with a path of "User.Dialing.InternetOn" and then enter the boolean value "1" or "0" to turn this feature on and off.
This way you can change nearly any settings in the client software without the need of accessing the end user's PC.

CRM Settings Deployment
The above process can be used to deliver CRM configuration also. This method however has some slightly special features that the client software also recognizes. To publish a CRM integration please follow these steps:
Example LDAP Settings Deployment
- Configure a CRM as you require it on a client PC.
- Go to C:\ProgamData\Go Integrator\Settings.xml directory.
- Open the settings file as above, and locate the
node that contains the required integration. The exact node will be called CRM1, CRM2, etc. Here is an example of such a node:
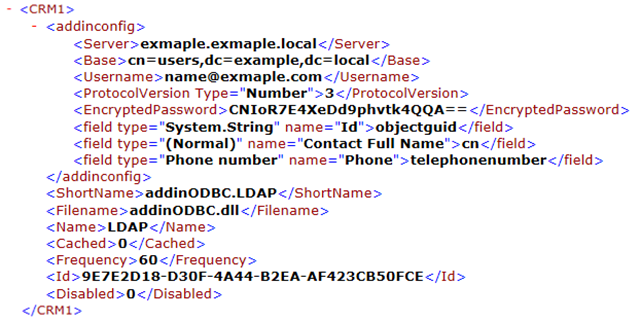
- Copy the entire XML settings content from between the "<CRM1>...</CRM1>" nodes.
- Create a column in the UCAD tool (as in the above examples) called Machine.Devices.LockedCRMx, where x can be any value, i.e. Machine.Devices.LockedCrm1.
- Paste it the XML setting into a newly created Machine.Devices.LockedCrm1 column and hit the Save button.
- Important!
Before saving any settings, always remember to check if you need to make any changes to the user's XML settings as these may vary from user to user e.g. Username or Password.
Note: Settings which are editable are marked in red.
- Important! These settings will make the CRM integration appear in the client software, and will not allow the end user to edit them, only view the settings. If changes are required, the system administrator will have to carry them out using the UCAD Tool.
 Report this page