Salesforce Adapter Guide
Note:Salesforce Adapter is not supported on Terminal Service or Citrix environments at present.
Pre-Requisites
- Access to an Administrator account for Salesforce
- The Go Integrator Client (version 3.0.12.18122 or higher) installed and started
- Go Integrator Client DB license
Enabling API within the Client Configuration
If your client is on version 3.2.1 or newer, there is now an extra step you must do to use Salesforce Adapter.
1. Right-click the Go Integrator tray icon in the system tray menu and then left-click the "Configuration" option from the menu that pops up.
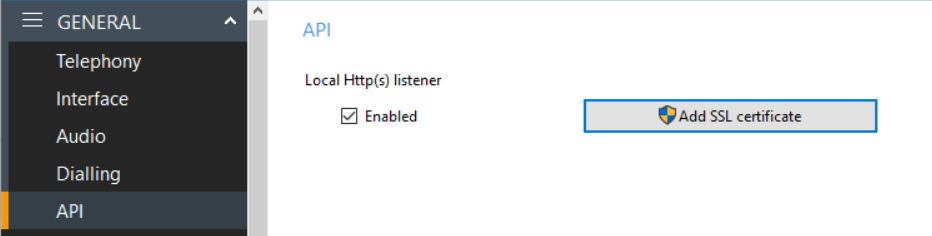
2. Under General, open API
3. Ensure "Local Http(s) listener" is Enabled by checking the box.
4. Press "Add SSL certificate".
5. Save the configuration.
Enabling Local HTTp(s) Listener
The Local Http(s) listener enables ports 21047 and 21049 to be open on the local machine. This is a mandatory requirement if you are using the Salesforce Adapter, Zoho Phonebridge integration or recording integration.
Enabling SSL Certificate
The SSL Certificate adds a self-signed certificate to the local machine that enables SSL secured web socket access. This is a mandatory requirement if you are using the Salesforce Adapter, Zoho Phonebridge integration or recording integration.
Table of Contents
Installation and Configuration
User Guide for Salesforce Adapter
FAQ
Appendixes
Installation and Configuration
Step 1:Download the Adapter's definition
Go to the following link to download and save the adapter's XML definition file:Download Go Integrator Salesforce Adapter.
Step 2:Import the Adapter definition
Login to Salesforce as an administrator, click on the cog and then select 'set up'

This will reveal the setup menus.
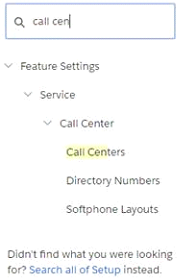
Search for 'Call Centres'. Once on this page, press 'import' and locate the adapter XML definition file, and press 'import' again.
Step 3:Manage Call Centre Users
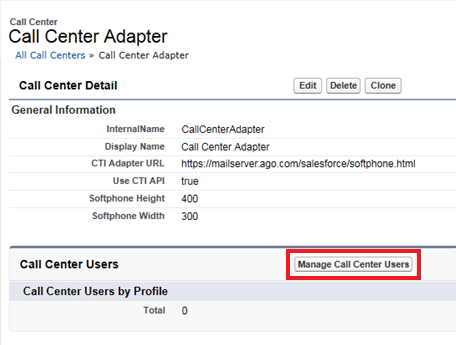
Once you have completed the import, you will be automatically taken to the Go Integrator Call Centre Adapter screen shown here. Click on the 'Manage Call Centre Users' button.
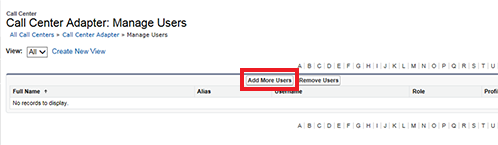
In the Manage Users screen, click the 'Add More Users' button to start adding users that you want to have access to the Adapter.
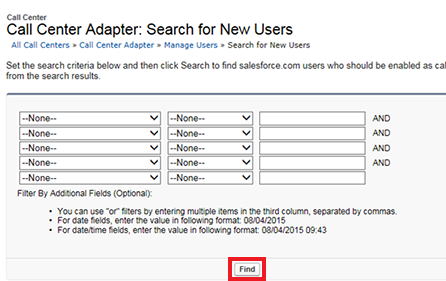
Use the search filters to locate the user(s) that you wish to add, or just leave the filters set to none, and then click the 'Find' button.
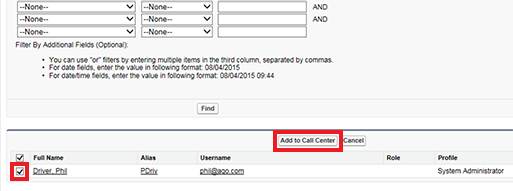
This will reveal your filtered list of users. As shown below, tick the user(s) that you want to add, and then click the 'Add to Call Centre' button.
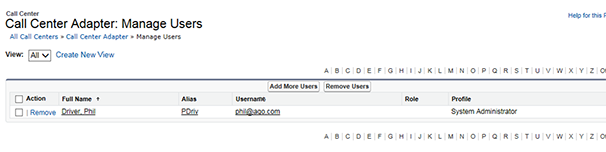
When you return to the Manage Users screen, you'll see your selected users listed.
Step 4:App Manager
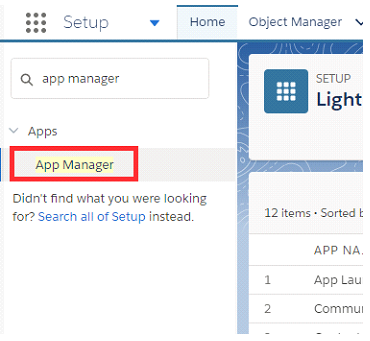
Next, search in the 'quick find' box again, this time, for 'App Manager'.
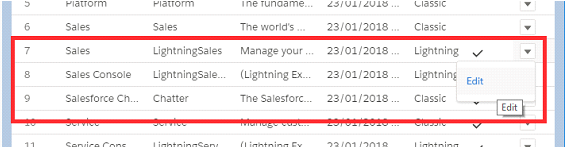
A list of applications will appear. Select an application that has an app type of 'Lightning'. Press the drop down menu and then 'edit'.
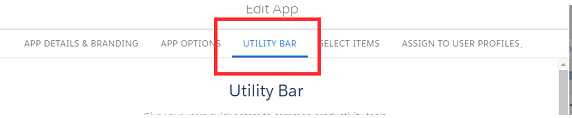
Select 'Utility Bar' from the 'edit app' form that appears.
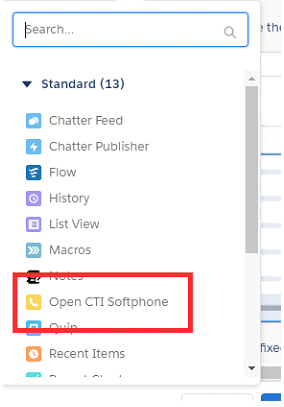
Select 'add' and choose 'Open CTI Softphone' from the drop down.
The panel width/height is set automatically but can be changed if required. To do this, edit the details under the CTI Softphone form. Once you are happy with the options, press 'save'.
IMPORTANT:
- Visibility is configured per Salesforce App - i.e. you need to add it to each App that you want it to be accessible in.
- Ensure the user is assigned the Lightning Centre Adapter otherwise it will not be displayed in their utility bar.
- You may need to refresh the page for it to show - i.e. Ctrl F5

Panel Status
If the user has Go Integrator running and a valid DB level license, their Softphone State will show as 'Available' and they are ready to work with the Softphone.
If the user is experiencing connection issues, or their Go Integrator client does not support the Salesforce integration, their state will show as 'Not connected'. See the trouble shooting section for help.
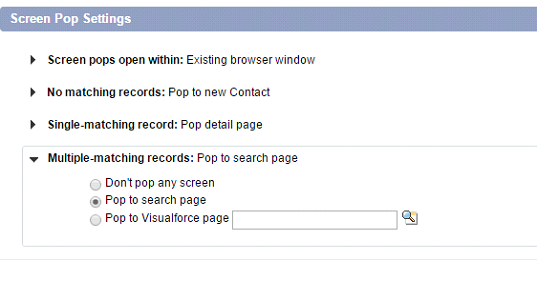
Configuring Multiple Search Results Feature
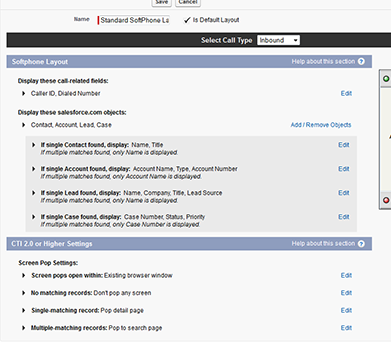
To allow the multiple searching to work the admin must enable a setting as follows (see screenshot).
- Go to Customize - Call Centres - Softphone Layouts
- Edit the Standard Softphone Layout
- In section 'Screen Pop Settings' - Multiple-Matching records, press edit
- Select the option "Pop to search page"
Customise "New" Entity
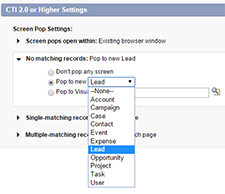
If this setting is not configured, then the "+" button will create a new lead. If not configured it is either "No matching records" is set to "Don't pop any screen" or "Pop to New '–None—'".
Customising the behaviour of the "+" button can be done by selecting another entity in the list.
Note:Different Softphone Layouts can be created and assigned for each user allowing customising of the behaviour for each user. This is not covered here in this guide.
Trouble shooting
If the status on the Softphone panel shows as "Not Connected", check the following:
- Check that the user has their Go Integrator client running and connected to their host account
- Please check that your client meets the prerequisite version for Salesforce Adapter
- Check that the user has a valid DB license assigned to them, and that they have "DB" selected as the License Type in their client configuration
If the Softphone panel does not appear for a user:
- Check that the user is assigned to use the Go Integrator Salesforce Adapter (they should be listed in the Manage Users page shown in Step 3 above)
If multiple contacts found and search button does not work:
- You should check section "Configuring Multiple Search Results Feature" above
Optional Configuration
Include the Users Time Zone in the Call History Subject
Install this Salesforce Apex class in order to include the users Timezone in the Call History subject, for example:
Inbound Call at 16:11:36 Europe/London from 07814256404 (Fred Bloggs)
Inbound Call at 16:14:28 Asia/Hong Kong from 01202528735 (John Smith)
Inbound Call at 16:14:50 Asia/Hong Kong from 01202528732 (Bournemouth)
Note:If the Apex class is not installed the softphone will work as usual however will not show a Timezone in the subject.
To Install the Salesforce Apex class
- Go to Setup -> Build -> Develop -> Apex Classes.
- Select New Apex Class.
- Paste the below code to the edit box and save.
global class GetCurrentUser{
webService static String getUserTimeZone() {
TimeZone tz = UserInfo.getTimeZone();
return tz.getDisplayName();
}
webService static String getUserId() {
return UserInfo.getUserId();
}
}
To Modify the InternalNumbersDigits Length (version 1.0.1+)
In the event that a site has internal extension numbers longer than 5 (default), you should add the method described below to the Apex class.
By adding this method you can override the default value. If the length of the phone number received during a call event is less than or equal to this value, then the call is considered to be an internal call.
- Internal calls never get assigned a related entity (1.0.1)
- Internal calls do not cause a contact search in Salesforce softphone
Add the following to the body of the Apex class.
webService static integer getInternalNumbersDigitsLength(){
}
Setting search Entities
When a call is made or received you can customize which entities are searched for a match by configuring the Softphone Layout as below.
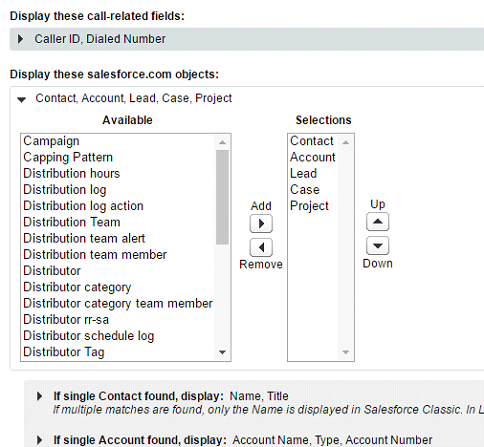
NB:There are limitations in searching the Cases by phone number; this is a limitation of Salesforce API at time of writing. Salesforce cannot search the associated contact for a Case.
If multiple matching entities are returned from Salesforce, then the adapter will follow the setting configured under "Multiple Matching records" in the Softphone Layout as shown below.
User Guide for Salesforce Adapter
The Salesforce Adapter presents a convenient embedded call control window in the Salesforce browser window to allow tight integration between Salesforce and the users handset.
Users can interact with Salesforce to initiate calls, answer calls, and to add new or "pop" existing entities such as Leads, Contacts, Cases etc. using the telephone number of the caller or called party. Call History records are also written against the selected entities.
Key Features
- Create a new Salesforce record (lead/account/case/etc)
- Pop an existing Salesforce record
- Click to Call
- Write a call record against a Salesforce entity
- Answer, hold and hang-up the call without leaving Salesforce
User Interface
The Adapter provides and embedded user interface within the classic Salesforce view.
When a phone call is received, the adapter will automatically search through all of the records held within Salesforce to find the number that is dialing in. Depending on what it finds, one of three things will happen:
One:
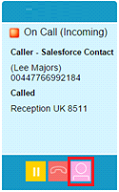
The phone number is found once: The Phone Panel displays a 'pop' button. This button allows the user to open the record that has been found.
Two:
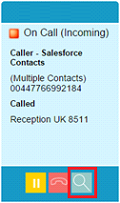
Multiple instances of the phone number are found: The Phone Panel displays a 'search' button. Clicking this will show the multiple instances found, allowing the user to manually select the correct instance.
Three:
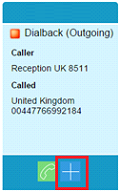
The phone number is not found:The Phone Panel displays the 'New' button. Clicking this button will create and open a new entity with an association to the caller's number.
Answer, hold and hang-up the call without leaving Salesforce
The Adapter offers buttons for the call control features Answer, Hold and Transfer from within the Salesforce page.
Click to Call
Click to call provides the ability to click on a phone number in Salesforce in order to have your desk phone dial that number. The Adapter also includes a convenient phone number dial field to allow the user to dial a custom number by entering the number and pressing dial button.

NB:Over recent periods new in-browsers dialers have been introduced by third parties. If you experience issues with dialing, you should ensure that no browser dialing addons are active.
Adapter behaviour
Write a call record against a Salesforce entity
Telephone call activity recording is performed by inserting a completed Activity into Salesforce and where possible associating the activity with a Salesforce entity. This document uses the term "Call Record" to describe the activity record that is created in Salesforce.
When is a Call Record created?
A Call Record is created when a user running the Salesforce Adapter hangs-up or transfers a telephone call from the handset that is monitored by the Adapter.
How is a Call Record associated with a Salesforce Entity?
Associating a call to an entity is affected by multiple situations. This is because the only possible matching opportunity is using the external phone number associated with the active call. Within Salesforce, a number can appear more than once e.g. against a contact, against a company or even multiple times in various leads. This means the recording method relies on user interaction to improve and confirm the entity associations.
Should a match be made, the user can pop to the entity and continue to use Salesforce as they typically would. On call completion, the Call Record will be saved and associated with the current open page. So, in the scenario where the first entity popped was not the preferred match and the user then navigates to the correct match (account for example), then the adapter will use the new entity as the preferred match.
If there is a single match for the contact for an inbound or outbound call, and no interaction is made (for example "popping" the contact record) then the call record will still be associated with that contact automatically.
If there is more than one match, then the user must select a contact for the Call Record to be associated with. If the user does not interact by navigating to an entity in Salesforce, a Call Record will still be added on call completion, but no entity association will be made.
Outbound calls are handled similarly as a single matched record. For example, if click to dial is actioned from an entity's page, it can be asserted that this is the correct entity to associate the Call Record with. Therefore in this case, if the user completes the call without any actual interaction, it will be associated with this entity.
Impact of Transferring a call
In telephony, a call is completed when user transfers or hangs up the active call on their handset. So, in the transfer call scenario, there will be two or more call completion points, hence more than one call saved.
Manual Dialing
What if you don't dial or click to dial from within Salesforce, that is, you manually make a call from the handset. If the user is logged into Salesforce and the Adapter is connected, the behaviour will be the same as if using "click to dial" from within Salesforce. i.e. if a single contact entity is matched it will be associated with the entity, if more than one is matched and no interaction takes places to select the entity, then it will not be associated. However, if you are not logged in to Salesforce with the Adapter connected then no Call Record will be logged.
Internal calls and Dialing rules
Internal calls are saved, however from version 1.0.1 they will not be associated with Salesforce entity. They will show in Call Centre / Call related reports. Determining whether a call is internal or external is governed by the settings in client software that the Adapter uses to make the connection to the telephone system (by default a number of 6 digits or greater is treated as external).
Reporting on Call Records
To report on call history, the user is required to create a Salesforce report. Follow the steps provided in the appendices on Creating Call History report.
As the call is recorded as a Salesforce Activity we are limited to what information we can store. (See appendices on Call Record Example.)
Summary of Call Record Association handling
Outbound
- Click to dial has the best chance of correct association as it uses the page dialed from.
- If single match is made that entity is associated with the call record.
- If dialed from List Page, like Home page, then you should navigate to an entity for correct association to occur.
- Manual dial via number entry - user should dial from home screen i.e. not from an entities page. Without interaction, it will not associate with any entity, but if you are on a contact record it will associate with that record.
Inbound
- If single match is made that entity is associated with the call record.
- If multiple matches are found, then based on the user's interaction of selecting a contact will determine the association.
- If not found and user select new button, call record is associated with the new record.
- If not found and call ends without selecting the new button then no association is made.
Transfer
- Multiple Calls records are created for each user who handles the call
- Searches occur after a transfer - so second user will also need to navigate to correct contact
Internal calls
- Are saved - from 1.0.1 onwards are not associated with Salesforce entity other than user - internal calls follows dialing rules set in the client for min Length and must start with
Dial from handset.
- Call recorded if Salesforce is open, logged in, Client is running, user has CRM license and Adapter is active on an open Salesforce page. No SF adapter no record saved. Note that some Salesforce pages do not have an Adapter section e.g. Report page and Chatter page
FAQ
I know I called John Smith, but there is no call record. What could cause no call record?
For a call record to be saved - the desktop Client must be running and "Connected" to the user's device AND Salesforce Adapter must be active "Connected" and receiving events. If one of these conditions are not met then a call cannot be recorded.
Where can I see a report of all calls for my department?
You will need to add a Salesforce report on Activities - follow the instructions in Appendices Creating Call History report.
I never made that call, where did it come from?
Check if someone else logged into your Salesforce account and if they have a Salesforce adapter configured. This would generate a call record for your user when a call is made.
Why does my adapter say "Not Connected"?
Check that your client is running and has a valid CRM/DB license.
I can dial from Salesforce but my adapter says not connected? Why?
Click to dial is a basic level feature of the client software. The dial may be using a browsers addon or extension. In other words you can configure click to dial in any browser even if you have a CLIENT license. So, it is feasible that you have enabled this via another method and its not actually using the adapter to facilitate click to dial.
Why does the initial call show up in the adapter as a valid contact name, then it shows as not found?
If you have configured another CRM integration in the client, e.g. Outlook, the event that is received may have been decorated with a found contact from another CRM and added this information to the call event. You should be aware that other CRMs can be configured alongside the SF adapter, you should be aware of this behaviour.
Appendixes
Call record examples
A call record is an Activity and includes the following fields
Assigned to: Salesforce user involved with the call
Description: text field describing the call in the format:
e.g. Outbound Call at 1:09:36 PM Greenwich Mean Time to 07814256404 (David Teague)
Duration: seconds
Date: Date of the call
Priority: Normal - this is set by Salesforce
Status: Adapter sets the task as completed
Task: Ticked as per completed above
Associated entity: one or more entities] By associating the activity with and entity, the call is visible in an entities Activity History panel
Creating Call History report
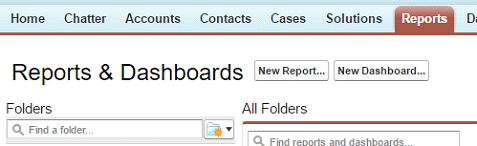
In Salesforce navigate to the Reports tab and select New Report
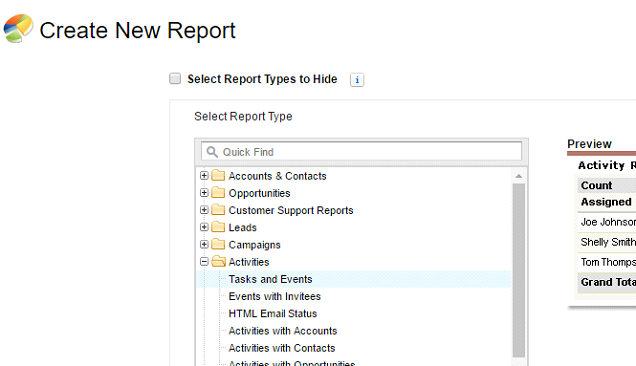
Select an Activities and Task report and select "Create"
You are taken to a customize page, select Save
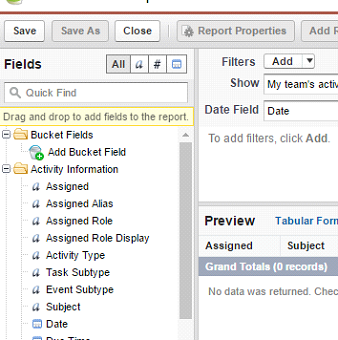
Name the report and specify its visibility/Report Folder.
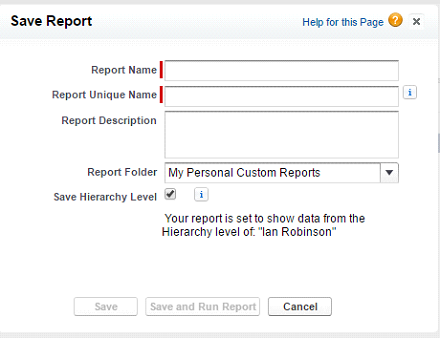
You have created a Call report.
To improve the report we suggest adding Duration, and Call Start time.
 Report this page