Custom Layouts
This section describes how you can manage your own custom layouts
How to access
File>Configuration>Wallboard Layouts
Add –Add new Layout.
Edit –Edit existing Layout.
Import –Import a Layout template.
Delete –Delete a Layout from the list.
Layout Configuration
Add new Layout
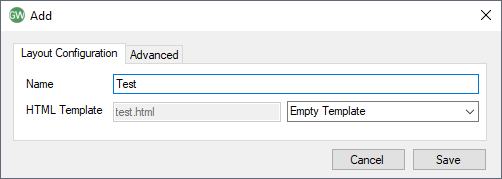
Click Add.
Give the Layout a Name.
Choose a Template from the dropdown menu: Empty Template, Example Layouts (AllStats Layout, Example, Simple Layout) and System Layouts (these are the standard layouts shipped with the product).
Empty Template –A completely Blank template.
AllStats Layout –A template which includes all available stats.
Example –A simple template which includes some basic statistical elements but does not include any styling.
Simple Layout –A simple template which includes some basic statistical elements and styling.
Click Save to save the Layout
Edit Layout
Left-click on the Layout you wish to edit and then left-click the Edit button.
In the window which opens, click Edit again – this will open your default HTML editor.

NOTE–Custom Templates are saved in C:\Users\[Username]\AppData\Local\MondagoWallboard\CustomTemplates\ when performing a Save action the .html file in this location will be updated and the Layout will automatically refresh in Go Wallboard if it is the active Layout.
IMPORTANT NOTE:If the Save As...action is used from within the editor, it is recommended that you save the .html file in a different location and then use the Import option to add the Layout to Go Wallboard.
Import Layout
Left-click Import button.
Navigate to the location of the HTML file for the layout you wish to import and click Open.
Note: If a Layout already exists with the same file name as the layout you wish to import, the import process will fail.
Delete Layout
Left-click on the Layout you wish to delete and then left-click Delete button.
Editing a Layout
Wallboard custom layouts use standard HTML and CSS, so anyone proficient in web design/development should be able to create a wallboard design or easily modify the sample templates to their needs.
General Layout
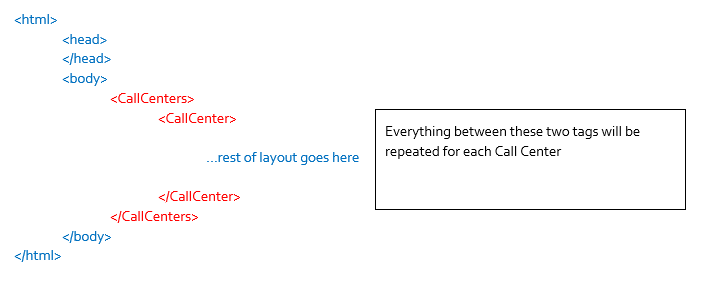
The basic structure is as follows, "blue tags" are the standard HTML and "red tags" are the custom wallboard ones.
Agent and Call Data
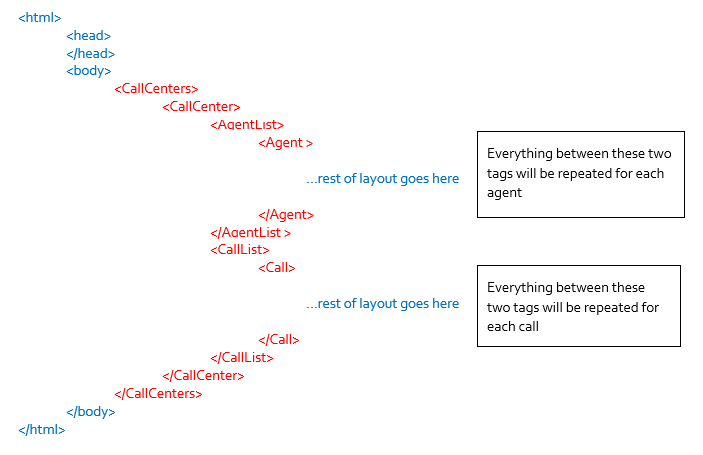
It's also possible to have lists of agents or calls – these need to be within an existing <CallCenter> tag as the list of agents or calls are the ones related to that call centre. </CallCenter>
Example
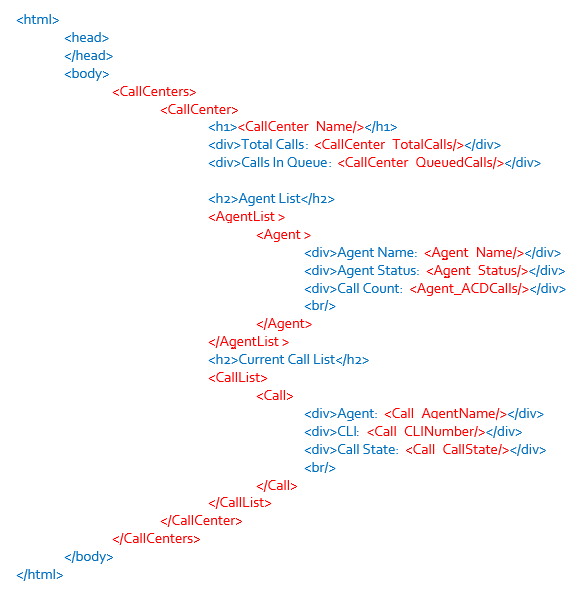
To put this all together and to show some relevant statistics, see the following example.
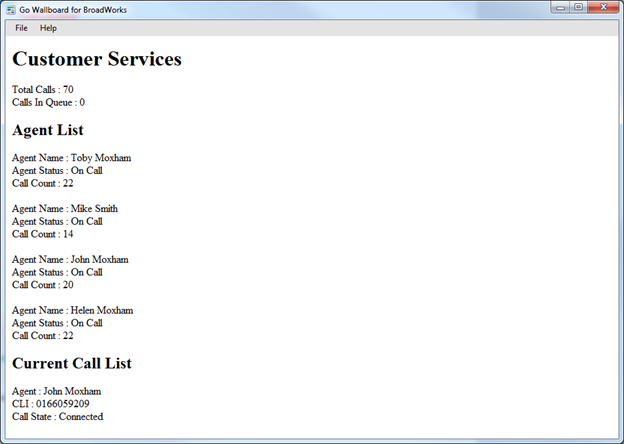
This layout will result in a very simple layout as follows, layouts can be styled however you want using standard html layout and CSS, please see the example layouts for examples of different layouts and how to show tabular lists.
AVAILABLE STATISTICS
CALL CENTRE STATS
These should be within a "<CallCenter>" tag but not within an "<AgentList>" or "<CallList>"
CallCenter_TotalCalls/
CallCenter_AbandonedCalls/
CallCenter_LongestWait/
CallCenter_QueuedCalls/
CallCenter_AverageWait/
CallCenter_AverageTalk/
CallCenter_AnsweredCalls/
CallCenter_AverageAbandonedWait/
CallCenter_CallsAnsweredWithinXSecPercentage/
CallCenter_AverageAnsweredWait/
CallCenter_Name/
CallCenter_MostActiveAgent/
CallCenter_AgentsAvailableCount/
CallCenter_AgentsAvailablePercent/
CallCenter_AgentsBusyCount/
CallCenter_AverageTalk_XSI/
CallCenter_OverflowedCalls/
CallCenter_TotalOverflowedWait/
CallCenter_AverageOverflowedWait/
CallCenter_ServiceLevel/
CallCenter_AbandonedCallsPercent/
CallCenter_BouncedCalls/
CallCenter_AgentsWrapupCount
CallCenter_AgentsSignedOutCount
CallCenter_AgentsSignedInCount
CallCenter_AgentsUnavailableCount
CallCenter_AgentsWrapupAndUnavailableCount
CallCenter_AgentsWrapupAndUnavailableAndSignedOutCount
CALL STATS
These can only be within a "<Call>" tag
Call_AgentName/
Call_RemoteName/
Call_RemoteCallType/
Call_CallState/
Call_RingingDuration/
Call_ConnectedDuration/
Call_AddedDateTime/
Call_ConnectedDateTime/
Call_ACDNumber/
call_clinumber/
Call_CallerContact/
Call_CallerCompany/
Call_CallerContactAndCompany/
AGENT STATS
These can only be within a "<Agent>" <Agent> tag </Agent>
Agent_Name/
Agent_Status/
Agent_ACDCalls/
Agent_IncomingTotal/
Agent_IncomingGroup/
Agent_IncomingExternal/
Agent_OutgoingTotal/
Agent_OutgoingGroup/
Agent_OutgoingExternal/
Agent_AverageWrapup/
Agent_AverageACDIncoming/
Agent_AverageACDOutbound/
Agent_DurationLoggedIn/
Agent_CurrentCallDuration/
Agent_TotalACDIncomingTime/
Agent_SignInTimestamp/
Agent_CurrentCaller/
Agent_CurrentCallAnswerTimeStamp/
Agent_CallerCLI/
Agent_CallerContact/
Agent_CallerCompany/
Agent_CallerContactAndCompany/
Disposition codes
These can only be within a "<DispositionCode>" <DispositionCode> tag </DispositionCode>
DispositionCode_Description/
DispositionCode_Code/
DispositionCode_Level/
DispositionCode_ACDInboundCallCount/
DispositionCode_ACDOutboundCallCount/
DispositionCode_DnisList
DispositionCode_Dnis
DispositionCode_DNIS_Name/
CSS DATA SELECTORS- ADVANCED
If you want to have elements changing colour in the layout – for example if the number of calls in a queue is more than zero or if the agent is in a particular state then you can use client side javascript to change the colour of the element. Another method is to use CSS data selectors – this is used in the All Stats Layout example layout, please refer to it for the full example.
The way it works is the wallboard can insert a relevant statistic value into the data element of a "<div>", see section highlighted in "Red":

When the wallboard parses the html, it will insert the relevant value in and result in this – in this example 5 queued calls

This can allow you to use the CSS such as this to change the colour dependent on the value

The same technique is used in the agent table in the All Stats Layout using the following line

When this is parsed by the wallboard it will result in this – in this example the agent was on a call

Together with the css here you can make the table row change colour depending on the agent state

The data tags are the same as the main statistic tags in the last section but prefixed with data-

ADVANCED
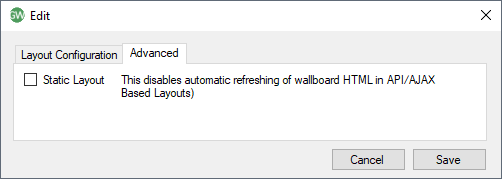
Select this option if using the API method ONLY to display wallboard data.

 Report this page